by Matt Philleo | May 2, 2016 | How to Draw Instruction
As many of my readers know, I just started teaching my very first drawing class at my studio this week. I created a 5-session course to help beginning artists learn skills that will help them create realistic, detailed portraits they can be proud of.
Since I normally am a “fly-by-the-seat-of-my-pants” kind of guy, I figured I would do better and create an intricate, elaborate lesson plan with 50-some drawing exercises (a little exaggeration) and that the students could knock them out in about 10-15 minutes. No problem, right?
Man, I am glad I only had one student.
It took me and and my student way, way longer to do these exercises than I had anticipated.
We had 5 exercises planned for the first two-hour session and only got the second one partway done!
Time to regroup.
Instead of trying to create several mediocre drawings, I am now shooting for the students in my class–well, in this case, one–to create just two really great drawings. And I”ll teach him every trick I know.
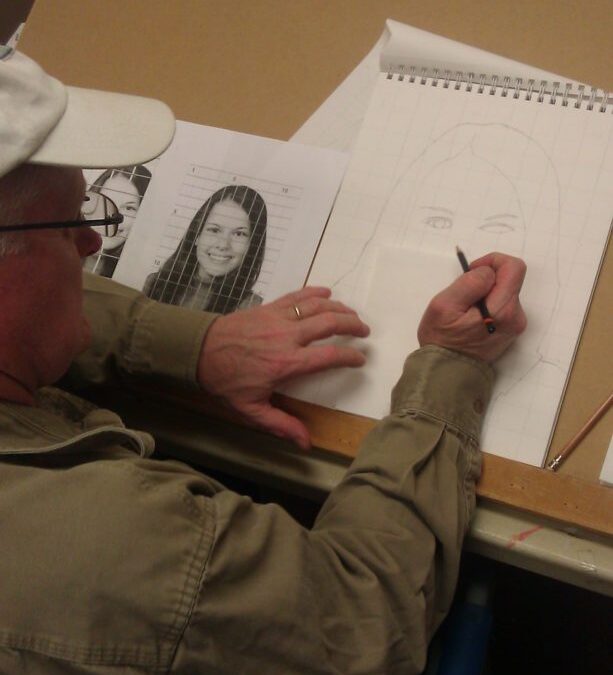
But so far, my student Tim, who is a professional taxidermist (you need some art skills to paint fish and deer mounts) did a good job on his first portrait attempt, based off a photo of young woman. Here it is in progress, after a little over an hour’s work. Not bad!
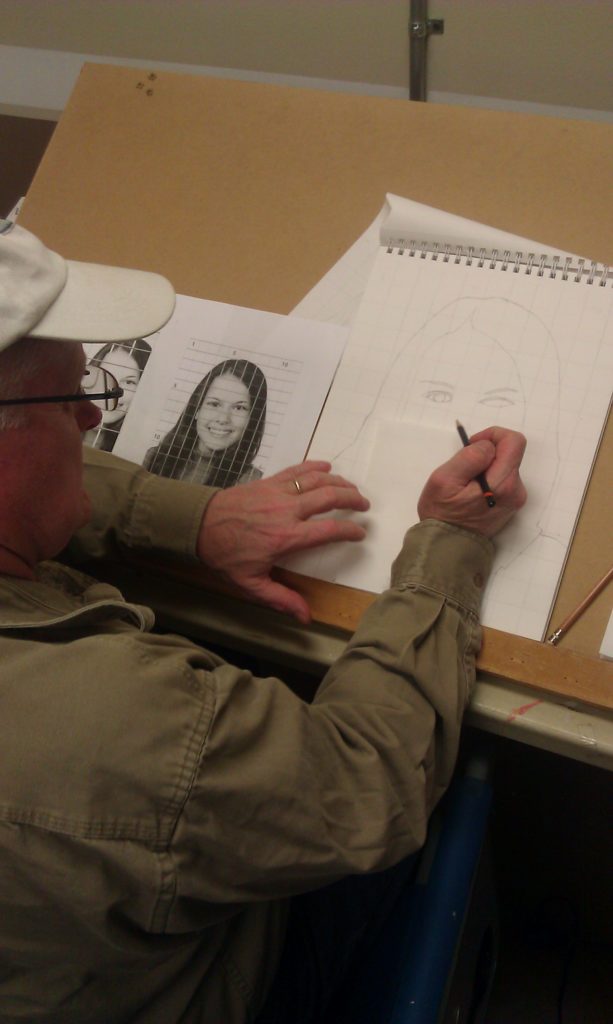
My student, Tim P., working on a pencil portrait
We start by using the grid method to gain proficiency in drawing what you actually see instead of what you think you see. Did you know Michaelangelo used this method to sketch in the composition for the Sistine Chapel? If it was good enough for him, it’s good enough for me!
In the coming week (today), we will shade this drawing in. After that, we’ll have the student create a drawing from one of his own photographs, and fully shade it in with tone and value. That way, he will end up with a fantastic drawing that is personally memorable to him, and something he’ll be proud of!
In an upcoming post, after I teach it in the class, I am going to share with you in depth, how I approach shading and value in a portrait sketch, and hopefully give you some tips if you like to draw.
But for now, I’m learning more is not always better. Sometimes it’s better to teach a few things well, than to teach many things poorly. And the same thing goes with learning, too! I am learning how to teach art–this is new thing for me.
We are all a work in progress.
Share Your Thoughts!
If you have any comments or questions about this post, please leave me your feedback below! I will personally get back to you. Can you help me spread the word? Please share this post with your family and friends by using the social media links on the side or below. Thank you!

by Matt Philleo | Apr 22, 2016 | How to Draw Instruction
People are one of the most challenging things for an artist to draw. To capture the unique appearance and personality of a person by using the right lines and shading takes patience and practice. Even as a professional portrait artist who loves his craft, sometimes after drawing dozens of faces a day at live events, it would be much easier to draw the tree behind the person sitting in front of me!
From childhood, we learn to draw people a certain way, an expected way. But it is not the most realistic way.
Far from it.
Here is a picture of how most of us learn to draw people.
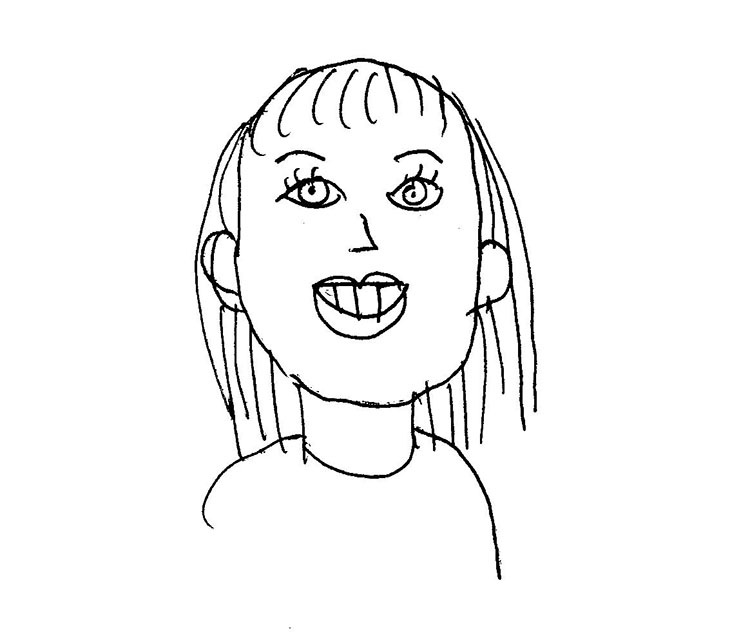
“A Strange Face”, pen on paper, by Matt Philleo
Even if you are not an artist, I’m sure you can tell this isn’t a very good drawing. I can say that freely, because I’m the artist who did it!
Here we have the eyes, with extra long cartoony eyelashes at the top of the head, an inverted “L” for a nose, and a funky-looking mouth.
Probably the biggest mistake people make when trying to draw a face is putting the eyes at the top of the head. Actually eyes are somewhere in the middle.
Next, the nose is best drawn by observing the contours of the nostrils and the thickness of the nose bridge and drawing those lines instead.
Finally, the mouth, especially when smiling, needs the cheekbones and wrinkles, along with squinting eyes to give the appearance of actually smiling.
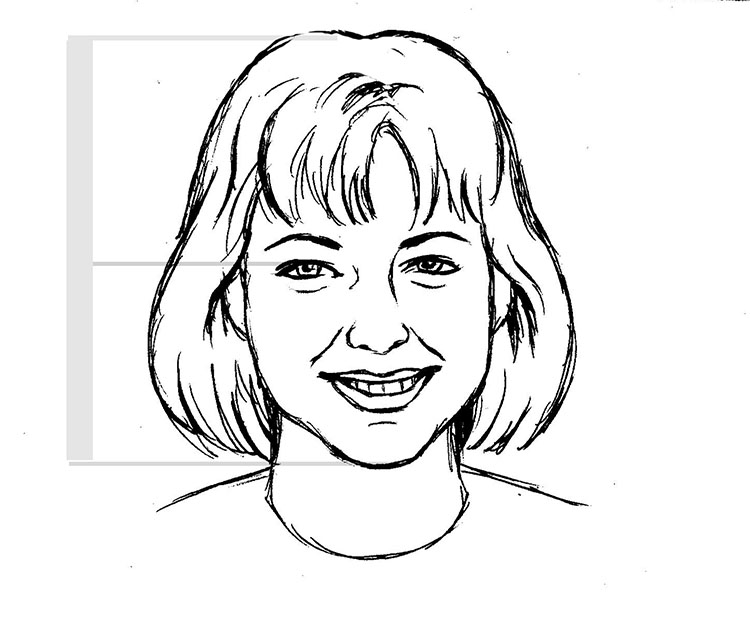
“A Better Face,” pen on paper, by Matt Philleo
Here is that same face, drawn with more lifelike proportions and shapes.
To draw realistically, you have to strive to draw what you see instead of what you think you see.
Your brain will play tricks on you.
It still does on me.
For example, I will find myself subconsciously smoothing out the shape of a crooked eyebrow, because smooth things are usually better. But if a person has a crooked eyebrow, it’s better not to try to be smarter than the photograph (or the person in front of you) or it won’t look right.
This takes practice, and a training of your eyes and mind to observe what you see in the three-dimensional world (or even two-dimensional rendition of the three dimensional world, a.k.a., the photograph) and transfer that onto paper. Although some people are more gifted with this ability and this skill comes more naturally, I think everyone that wants to learn how to draw can benefit from training in this way.
As an artist, your talent is not in your hands; it’s in your mind and soul.
I can become a better artist without even having to pick up a pencil or paintbrush.
How?
As I see people in various settings, with interesting expressions and lighting on their faces, I make a mental note and think of how that could be rendered on paper or canvas. When the time comes to draw or paint, my mind already has some visual material to to work with, and I have part of the technique already ironed out beforehand.
By the way, I will be teaching a drawing course at my studio at Artisan Forge Studios, where we start off at beginning level and move to more advanced techniques. Using your own photos as references, you will be able to create some portraits you can be proud of and show your friends and family at the end. The cost per two hour session is $40 and the class runs for five weeks, starting Monday April 25th, 6-8pm and going every Monday after that until May 23rd.
Here is a sketch I did of my brother and his family for Christmas. It took about 2-3 hours. Once you learn how to accurately draw proportions using line, you can get into shading and detail. That is something I plan to cover in another blog post.
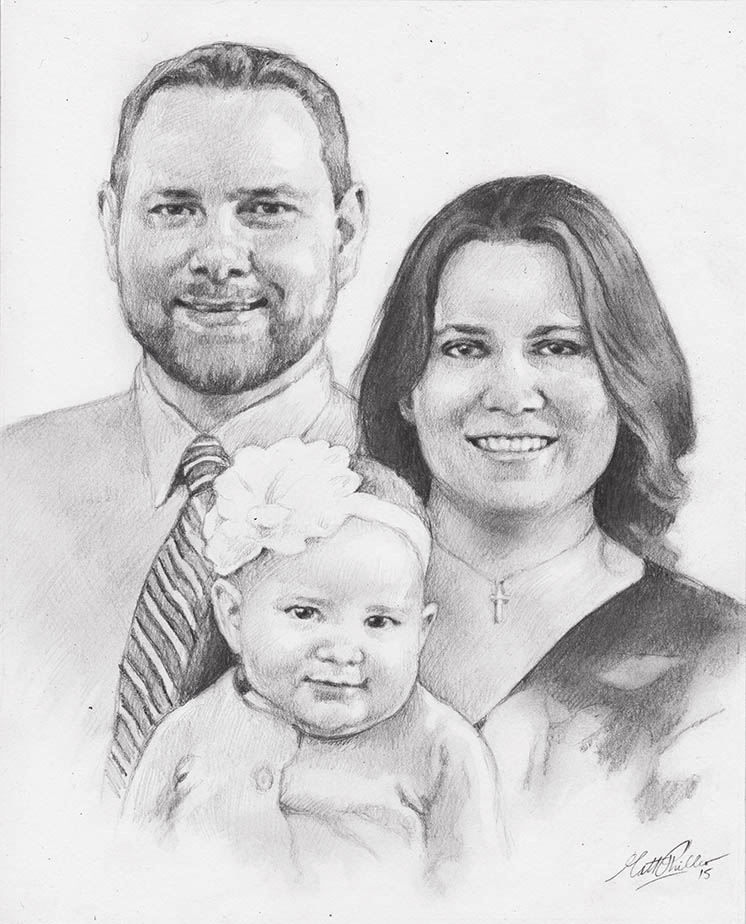
Portrait of Mike Philleo and family, 11 x 14, pencil on paper by pencil portrait artist Matt Philleo
Meanwhile, if you like to draw or are interested in learning how people draw realistically, I hope these tips help you. Let me know if there’s anything you’d like to know more about!
Share Your Thoughts!
If you have any comments or questions about this post, please leave me your feedback below! I will personally get back to you. Can you help me spread the word? Please share this post with your family and friends by using the social media links on the side or below. Thank you!

Recent Comments