by Matt Philleo | Jan 18, 2016 | How to Paint Instruction, My Art in Progress
For quite a while, I’ve wanted to do some instructional videos on painting and drawing. Here is my very first video! This is very off the cuff, and impromptu.
Basically, I’m just talking and showing you a behind the scenes peek as I work in my studio on a current painting commission, which is in progress, about 70% done.
In the future, I plan on doing more instructional videos, courses and live courses at my new studio at Artisan Forge Studios in Eau Claire. I don’t drink anymore, so who knows, maybe I’ll do a “Paint and Dip” event where you can create your own painting while enjoying a nice side of chips and homemade guacamole! ( l love guac and making it fresh from scratch!)
This video does cut off abruptly–which I do apologize for–but let me know me know what you think!
(Click the link below to see this video on my YouTube channel)
How to Paint Highlights in Acrylic
Share Your Thoughts!
If you have any comments or questions about this post, please leave me your feedback below! I will personally get back to you. Can you help me spread the word? Please share this post with your family and friends by using the social media links below. Thank you!
by Matt Philleo | Sep 23, 2015 | How to Paint Instruction, My Art in Progress, New Artwork, Tips for Artists
I have been doing commissioned portraits for 24 years, since I was in high school. One of the questions I’m often asked is: “How do you create your art?”
I am going to show you a recent portrait I did, step by step, and my hope is that you may be able to learn a few tips that will help you in your own portrait painting. Although I paint in acrylic, some of this information may help you even if you paint in oils. If you are not a painter, I hope this post will still be interesting to you! Who knows? You could even start painting today! For this particular example, my portrait was based off a great photo (which unfortunately I am unable to show since it was a professional photograph ) and it lent itself to a great painted portrait. Amateur snapshots can be used as a basis for a portrait, but unfortunately, the lighting and detail is usually lacking, so the image you create from them as an artist is similarly lacking in depth. Get the best photo you can, and your painting will be all the better for it. Step 1: Start Right With a SketchWithout a good sketch, you’re just shooting in the dark. The sketch is where you will create your composition, ensure the likeness of your subject–that is, make sure the person you’re painting looks like them–and define specific details.Be sure to center your subject on the surface of the canvas and if it is a head and shoulders portrait, the face should fill about 1/3-1/2 of the height of the canvas. Pay attention to the eyes and special details that make a person unique. Draw exactly what you see, not what you think you see. In the future, I plan on doing a lesson covering just the sketching/drawing aspect of portraiture, and there we will go more in depth on the process. Many artists find it difficult to sketch on canvas with a pencil. I do as well. Once pencil gets embedded in the canvas texture, it is extremely difficult to erase. You may be able to get away with a very light pencil (3H or lighter) but even then, you will still find it difficult to erase if you use a lot of pencil strokes like I do.
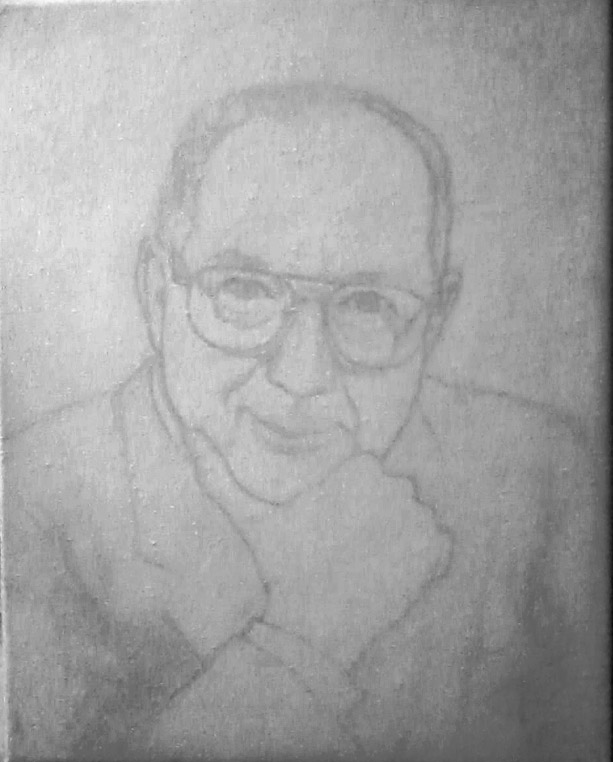
How to Paint Acrylic Portraits Step 1
And for every good pencil stroke I put down, I probably put down about 4 bad ones. I love erasers. I think there is an analogy about life in here somewhere, but I’m sure you can make the correlation yourself! Here is a trick I learned: I use a pastel or charcoal pencil instead. Pastel pencil erases with ease, but you will need a very good sharpener to keep it sharp and not break the lead in the process. Sometimes I use a knife if the sharpener doesn’t do the trick. Another great thing about pastel pencil is that you can use a sepia tone and it will blend in better with the flesh color of your paint. Graphite pencil sticks out like a sore thumb and you have to really work to conceal it in your painting. Because pastel pencil can almost be brushed off the surface of the canvas, it will be necessary to “seal in the sketch” so that you do not disturb or erase it as you paint. I use clear acrylic medium (Matte medium) thinned down with water of a ratio about 80% water/ 20% medium and put this solution in an empty hairspray bottle. Then I lightly mist the solution onto the surface of the canvas. If you find it starting to bead up heavily and dripping, take a cotton towel and gently blot the excess moisture off. Don’t worry–you will not ruin your sketch if you blot it.Let the canvas dry. In the meantime, dump out the excess solution into a separate container, and rinse out your spray bottle by filling it with straight water and spraying it several times to clear the solution out. If you don’t do this, you will need to find another spray bottle for your next painting because the nozzle will be clogged. After your canvas is completely dry, brush over the entire surface with matte medium to completely seal in the sketch. You will find that the pastel pencil sketch is not disturbed because you’ve already partially sealed it in already with the spray.
Take my FREE Acrylic Portrait Painting Challenge!

Learn how to paint a realistic acrylic portrait in my 2022 Spring Portrait Painting Challenge! Even if you’re a beginner. It’s free to join and I’ll teach you how to do it with online, step-by-step video lessons.
In May 2022, several artists like you will all be painting a portrait from the same photo reference. This will be a great chance to learn and create something amazing.
Take the Acrylic Portrait Painting Challenge (it’s free to enter)…and I’ll send you a welcome kit, which includes:
- My Complete Supplies List you will need to paint along (paint, mediums, brushes, canvas, etc.)
- A Palette Guide on how to set up your colors for easy paint mixing.
- The Reference Photo With Grid (coming soon.) It will help you create an accurate, frustration-free sketch!
- Step-by-Step Demonstration Videos on how to paint the portrait successfully, sent right to your inbox.
- Access to my private Facebook Group where you can post your progress, get feedback and be encouraged.
Click the link below to register for my Acrylic Portrait Painting Challenge and get started…
And now back to our tutorial…
Step 2: Define Your Values. Of course, you know I’m not talking about family values, company ethics or anything like that. (Although those don’t hurt either!) Values are areas of light and dark in artwork, and how they relate to each other. To begin the painting process, I like to take a glaze, a mixture of burnt umber, raw sienna and white, thinned to about 70% translucency with matte medium and then paint that over the entire sketch. What this does is mute the sketch a little bit, so the contrast is not so harsh. And that makes the paint blend in a lot better. Let this dry. Next, use a slightly darker glaze and fill in the darker areas, such as clothing, the background, especially if it will be darker than the value of the face. Brush it out as smoothly as possible. What we want to do is quickly establish the tonal values of the painting and define the contours of the face, hand and clothing. In realistic paintings, we do not use a line to define an person or object from the background, but rather, we separate them by value and color.
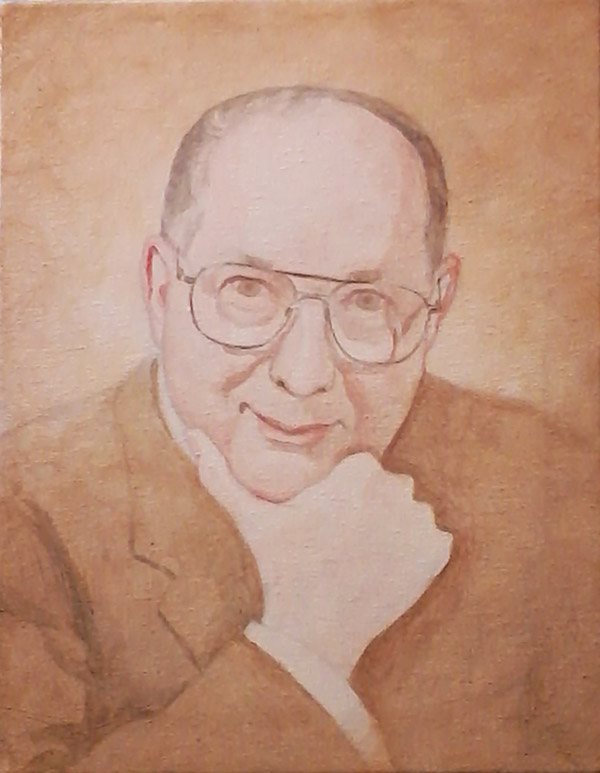
How to Paint Acrylic Portraits Step 2
Having correct value and color is vital. You can add nit-picking point-by-point detail to a painting all you want, but if you don’t establish correct value and color, it will only look amateurish.
Step 3: Keep on Adding Value As you add more and more glazes, the painting will begin to take shape. By glazing, you are adding a richness and depth that opaque color can’t achieve. In this stage, I am paying close attention to the color choice for the background. I am intentionally adding burnt sienna on the perimeter to give the background warmth, and lightening it to raw sienna and yellow ochre as I work toward the center. This draws your eye in towards the subject.
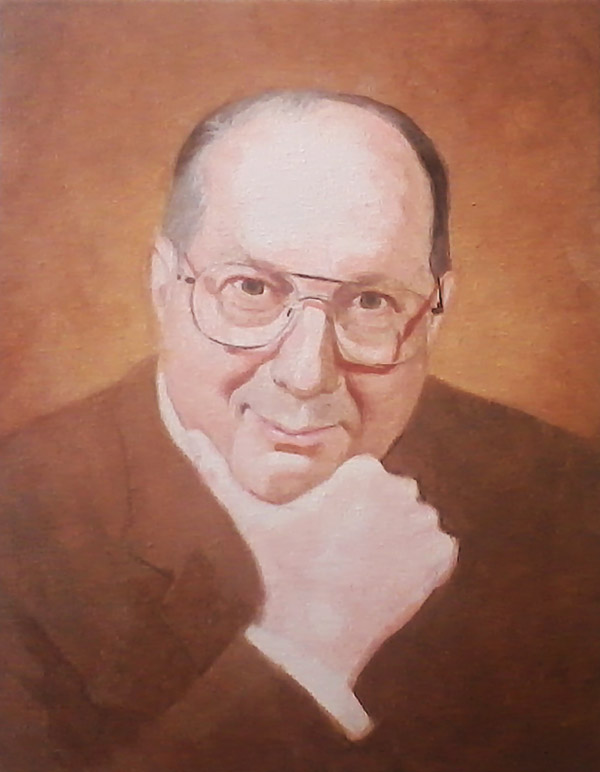
How to Paint Acrylic Portraits Step 3
In addition, I am carefully defining the features of the man’s face, by adding shadow to the nose, and especially under the glasses. The suit, by this time, has more than ten layers of glazes. Make sure you work your brush strokes in different directions as you glaze each time to smooth out the appearance of the paint layer. You can also use slightly different colors to add visual interest and vibrancy to the work. But what color choices should you use? Well, for a painting like this, that primarily has sepia tones, stay in that palette. But you will need to employ some cooler contrasting colors like blue and purple. Try to stay away from using black. It’s really a lifeless color. I establish black by using ultramarine blue, phthalo blue, and burnt umber in successive glazes. Here’s a good rule of thumb when mixing color, especially for portraits. I see so many artists that mix white into their colors in an attempt to achieve the lighter values of a portrait, but the end result is muddy. Flesh tones look sickly gray. Instead, do this: Use cool colors (blue, green and some browns) for darker areas and then use warmer colors (red, orange and yellow) for lighter areas. You will need to add red and orange into your flesh tones as you get into the lighter values, especially when you are painting a gradient–that is, a gradual shift from dark to light. Step 4: Clarify and Refine Your Painting. By this stage, you should have a really good idea of what your finished painting will look like. You’ve already established the majority of your values. The colors are mostly set. The painting should now look like a competent study created by a university art student. Now, it’s a matter of adding the nuances–those little details that really make the painting sizzle and beg to be looked at. Since in this example, I am painting a portrait on commission, and it is a memoriam painting of a lost loved one, it is more than making a painting that is visually compelling. The portrait must convey the likeness and personality of the man, because this will be a visual reminder to the grieving family of the person they loved so much. I received a card from one of the people in the bereaved family, and she said the painting made it like he was still there with her. To truly capture that “special something” in the subject, I believe, takes more than a trained eye and hand: it requires divine help. My habit is to pray before I start any work of art and before a studio session, especially when it’s a memoriam portrait. I pray that God will help me to capture the essence of the personality, and that it will truly bless and comfort the one who sees it. And He helps me. I believe you, too, will discover your painting process will go much smoother if you ask God for help. Now, at this level of completion, it’s time to add a simple yet extremely important detail: the reflection of light on the eyes. In most lighting situations, there will be a noticeable pinpoint reflection. Paintings made from outdoor portrait photography will often not have a bright reflection, but there still is a reflection of some sort.
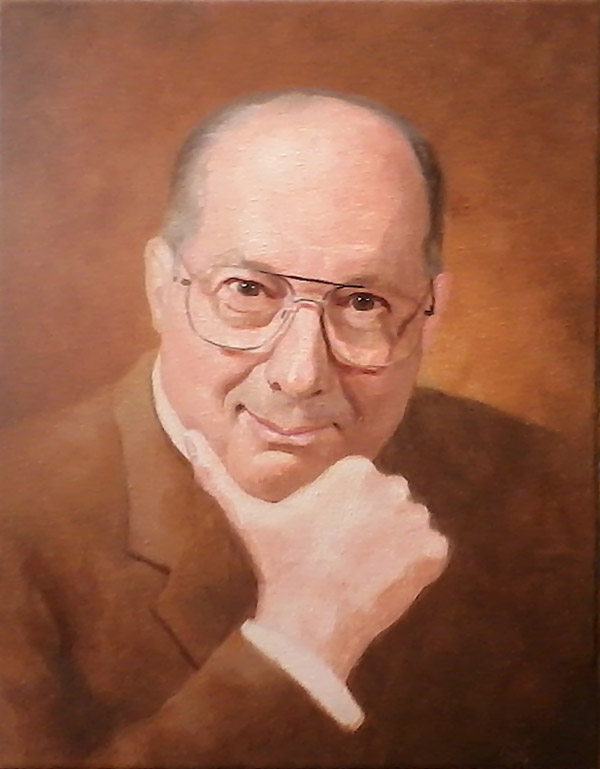
How to Paint Acrylic Portraits Step 4
Capturing this reflection correctly is of utmost importance. You can get away with a lot minor mistakes in a portrait–you can paint the ears a little too big, or the chin a little too long, or the forehead a little too small, but if you get the eyes wrong, your entire portrait is wrong. Why? Because we are trained to look at each other’s eyes when we talk to each other. The eyes are the most striking feature on our face, and some say, the window to our souls. To make a face recognizable, you must capture the eyes as near perfect as possible. So pay careful attention to where you put the reflection, and whether or not there is just one reflection on the pupil, or two. One reflection will always be brighter than the other, but look for that secondary reflection and capture it. The iris (the colored part of the pupil) will always be darker on the side of the reflection, and lighter on the opposite side. It’s similar to a jewel.Remember, too that the shape and color of the eyebrows, as well as how close they are to the eyes are nearly as important as the eyes themselves in capturing the likeness. Pay close attention to what you see in your photograph and replicate it faithfully onto the canvas. You should have already taken care of this–mostly–in your sketch, but don’t worry, you can refine these details in the painting process if you were a bit off. At this level, I really began to concentrate on refining the glasses on the man’s face and painting some highlights on his lips, to give the illusion of moisture. Step 5: Finalize it and Bring it Home! This is the fun part of painting. It’s the paycheck for putting in several hours of preliminary work to get the painting to a point where it really starts looking good. You could call it done, and convince many people that it is done, but you want this art to really be your best work and to shine, so don’t quit yet.
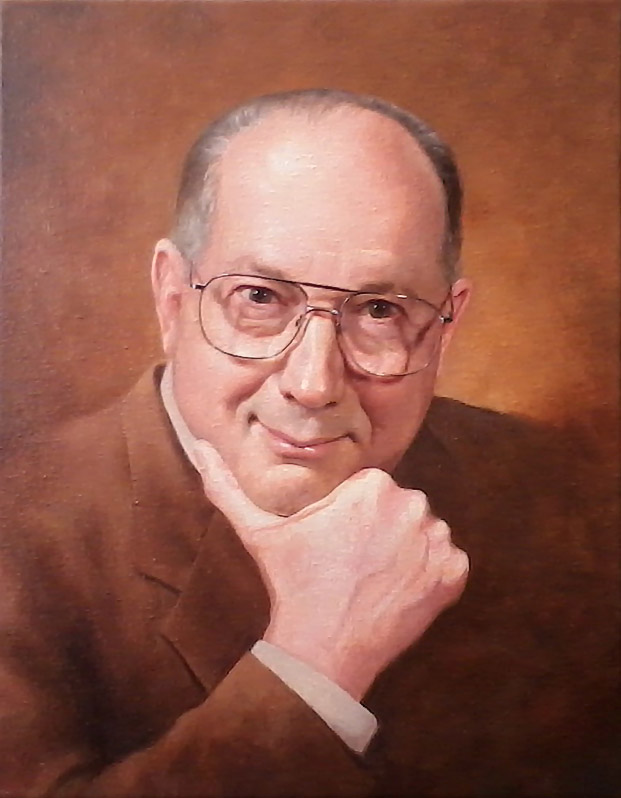
How to Paint Acrylic Portraits Step 5 by Matt Philleo
There are just a few more nuances to capture, a few tweaks needed to make the artwork come alive. For example, in this portrait what I needed to do was give a little more attention to the man’s hand. So I glazed some blue-purple using ultramarine blue and a little alizarin crimson, toned down by burnt umber and white, to suggest veins underneath the skin. Then I strengthened the shadows along the right side of the hand, and lightened the knuckles with some white mixed with a bit of yellow. (Remember, you want to almost always brighten up the lighter areas with warm colors.)Finally, I added some strands of hair on his hands for that final touch of texture. If this had been a portrait of a lady, we would definitely keep that out! Here’s a tip for drawing or painting hair: Don’t paint every strand. Rather, block in the hair with color and value, and suggest the strands by adding just a few loose hairs here and there. If you over-detail the hair you actually lose realism.In painting a great portrait, you want to keep in mind that the face has a variety of hues. If you can capture these subtle differences, you will go a long way in convincing the viewer that they are looking at a photograph, or even better, an image of a real person. We know the lips are pink, and of course with lipstick, red. But the cheeks and ears are often more pink than the rest of the face, and sometimes the nose. The area right around the eyes is a little more of a bluish color (but just slightly!) And for a man, especially if he has darker hair, you can suggest the five-o-clock shadow by using a slightly bluish or green-bluish brown. This is especially true with the shadows under the chin. Again, don’t overdo it, or your subject will look like they only shave every other day! So when is the painting done? Well, some people say once you sign it, it’s done. I have often signed my work only to discover, a moment later, an unresolved area that needs desperately to be worked out and finished off. I can tell you this: for a commissioned painting, once you take a photo of it and your client approves it, you better leave it alone. They love it, and so, it’s done. Hands off! If the painting is for exhibition, or even if you are wondering whether or not it is done before you do a proof image, here’s a good way to tell: If your painting looks fantastic, and then as you continue to work on it, you are not adding any visual appeal to it, stop. You may end up even messing up what you already did. It’s done. And of course, a rapidly approaching deadline may tell you that your painting is done. That’s why I love to work in acrylic. With its fast drying time, I can literally finish a painting, proof it, get paid for it and ship it out all in the same day! Finished!
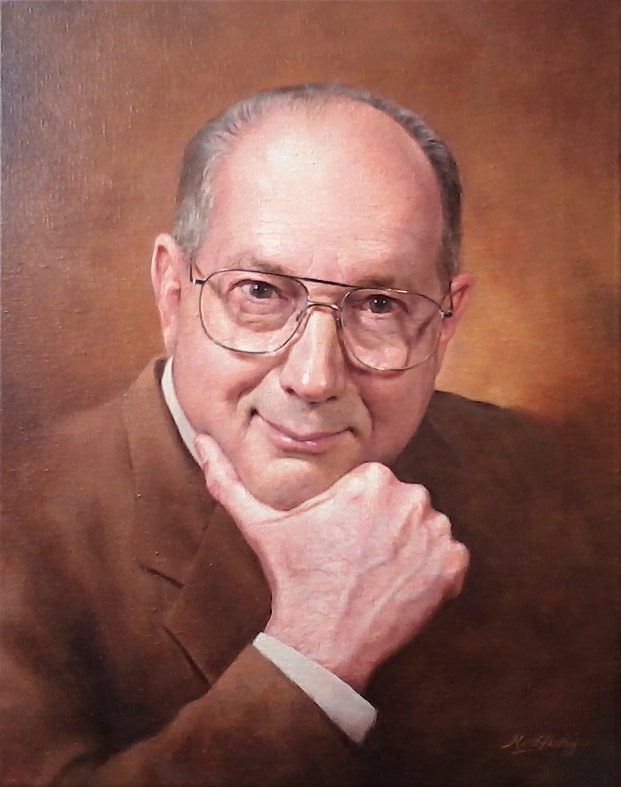
How to Paint Acrylic Portraits Final by Matt Philleo
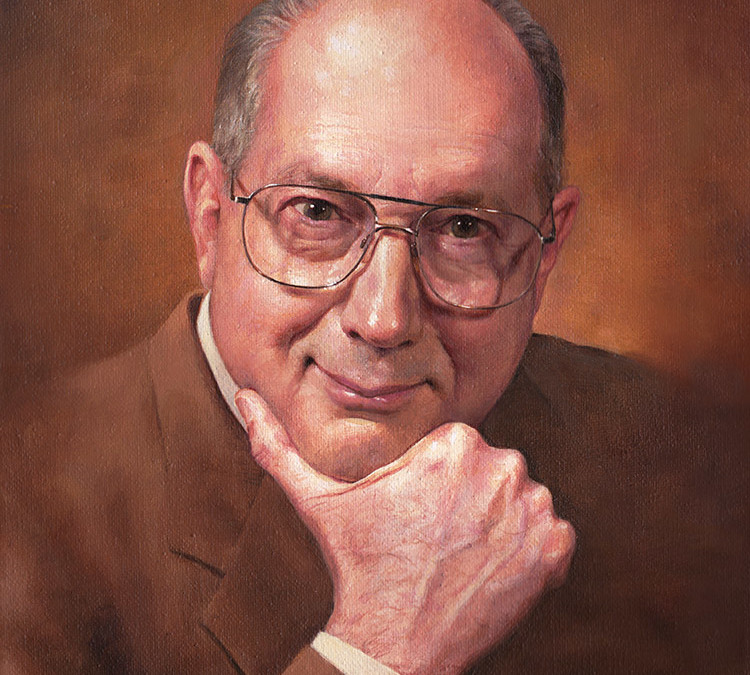
Lastly, here is the final portrait in a much clearer image. This 11″ x 14″ painting took about 30 hours to create.
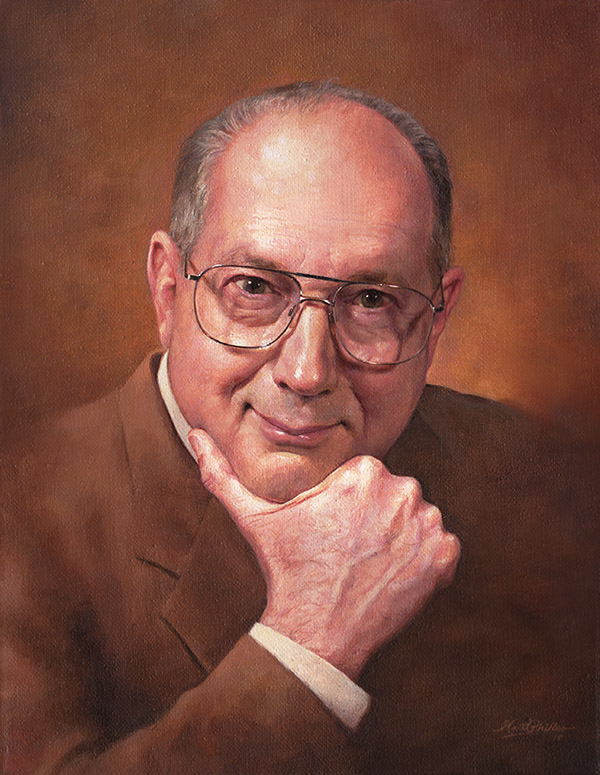
How to Paint Acrylic Portraits Final-clear by Matt Philleo
Oh, and just for fun, here are all the in progress shots of this painting, as a series. Now you can see the gradual shift in each stage of completion much easier.
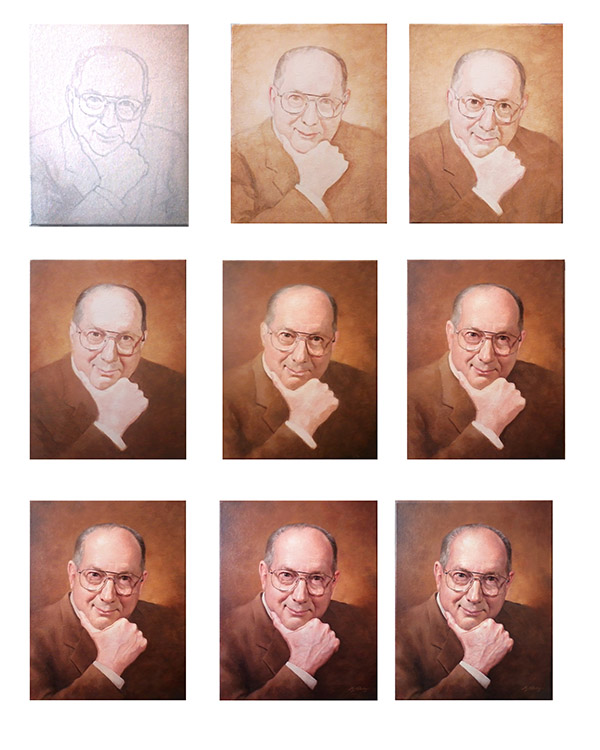
How to Paint an Acrylic Portrait In Progress
I hope these painting tips help you. Please let me know if you have any questions, or if I can help you with any painting project you may have! Share Your Thoughts! Please comment on this article and share with your friends using the social media links on the left sidebar or below. Thanks for spreading the word!

Recent Comments